使用Github Pages和Cloudflare Pages部署Pelican静态网站
文章目录
先决条件
- 已安装Anaconda用于Python环境管理
- 熟悉基本的Git概念知识
- 已有Github账号,并已新建项目仓库
username.github.io - 已有Cloudflare账号
安装配置本地Pelican项目
1. 新建环境
使用conda命令新建名为pelican的安装环境,并指定>3.7的python版本
# 创建新环境pelican
conda create -n pelican python=3.10

# 激活新环境pelican
conda activate pelican
新建项目文件夹,用于后续配置
mkdir ~/projects/gmlg.com
进入项目文件夹
cd ~/projects/gmlg.com
2. 安装Pelican
安装pelican软件,默认不支持markdown语法,需在安装时指定:
python -m pip install "pelican[markdown]"
如果历史已安装低版本,需要升级pelican,命令如下:
python -m pip install --upgrade pelican
如果希望美化排版,可以同时安装typogrify包:
python -m pip install typogrify
现在,运行Pelican快速开始命令,进入交互式配置界面
pelican-quickstart
交互内容供参考:
Welcome to pelican-quickstart v4.8.0.

This script will help you create a new Pelican-based website.

Please answer the following questions so this script can generate the files
needed by Pelican.


> Where do you want to create your new web site? [.] .
> What will be the title of this web site? 国民老公
> Who will be the author of this web site? Xavier Zhang
> What will be the default language of this web site? [en] en
> Do you want to specify a URL prefix? e.g., https://example.com   (Y/n) y
> What is your URL prefix? (see above example; no trailing slash) https://gmlg.com
> Do you want to enable article pagination? (Y/n) y
> How many articles per page do you want? [10] 10
> What is your time zone? [Europe/Rome] Asia/Shanghai
> Do you want to generate a tasks.py/Makefile to automate generation and publishing? (Y/n) y
> Do you want to upload your website using FTP? (y/N) n
> Do you want to upload your website using SSH? (y/N) n
> Do you want to upload your website using Dropbox? (y/N) n
> Do you want to upload your website using S3? (y/N) n
> Do you want to upload your website using Rackspace Cloud Files? (y/N) n
> Do you want to upload your website using GitHub Pages? (y/N) y
> Is this your personal page (username.github.io)? (y/N) y
Done. Your new project is available at /Users/xavier/Projects/gmlg.com
时区设置可参考: List of tz database time zones
默认的主题看起来比较丑,我们尝试下载新的主题,并练习一下相关的命令,作为参考。请注意这里选择练习用的主题为Attila( 仓库地址 ),下载后解压至当前项目根目录。安装主题:
pelican-themes -U attila # attila为解压后的主题文件夹
查看主题是否安装成功:
pelican-themes -l
查询结果显示安装成功:
simple
attila
notmyidea
修改pelicanconf.py中的主题为attila:
THEME = 'attila'
AUTHOR = 'Xavier'
SITENAME = '国民老公'
SITEURL = ''
安装主题需要的pelican插件的依赖插件:
python -m pip install pelican-neighbors pelican-webassets pelican-sitemap beautifulsoup4 pelican-readtime # 具体请参考主题仓库中的配置文件
然后下载相关插件:
# 在主目录安装插件
git clone --recursive https://github.com/getpelican/pelican-plugins
好了,到这里我们知道如何手动安装主题及插件,并在配置环境中进行启用。不过,Attila这个插件看起来还不够优雅,我们最终选用Github上由PaperMod移植而来的Papyrus主题进行正式环境的部署。
当然,如果您确实希望使用Attila主题,那么推荐可以借鉴一下Leo's blog,博主对该主题的应用,非常值得借鉴。
3. 安装Papyrus主题
主题需要 pelican-search, pelican-neighbors, pelican-readtime 和 pelican-toc 插件。前3个插件可以通过 pip 命令安装, Pelican-toc 需要手动安装。此外,我们需要安装 stork 和 beautifulsoup4 这两个依赖。
python -m pip install pelican-search \
&& python -m pip install pelican-neighbors \
&& python -m pip install pelican-readtime
在项目的根目录下新建themes 和 pelican-plugins文件夹。在 themes 文件夹下,克隆Papyrus主题。
mkdir themes \
&& cd themes \
&& git clone https://github.com/aleylara/Papyrus.git
现在,克隆 pelican-toc 的插件仓库到本地插件目录,并安装依赖模块 beautifulsoup4 。
mkdir pelican-plugins \
&& cd pelican-plugins \
&& git clone https://github.com/ingwinlu/pelican-toc.git \
# && git clone https://github.com/jameslittle230/stork.git \
&& python -m pip install beautifulsoup4
Papyrus主题已配置好搜索功能。不过我们仍需在本机操作系统安装 stork 包。可以通过命令 stork -h 来验证是否已安装 stork ,如果没有安装,请使用下方的任一命令进行安装。
# Install using Homebrew
brew install stork-search/stork-tap/stork

# Install using the Rust toolchain and install Stork with Cargo
cargo install stork-search --locked
如果brew安装时失败,提示Error: Command failed with exit 128: git,原因是 HomeBrew 的组件 homebrew-core 和 homebrew-cask 没有被识别为 Git 仓库。可以添加如下git全局变量后再试:
brew -v  # 根据输出结果的提示,输入下方命令,您的本机目录有可能不同

git config --global --add safe.directory /usr/local/Homebrew/Library/Taps/homebrew/homebrew-core \
&& git config --global --add safe.directory /usr/local/Homebrew/Library/Taps/homebrew/homebrew-cask
极个别情况下,使用 --add safe.directory 也没用,那你可以将相关目录移除、然后重新添加,命令示例如下:
rm -rf /usr/local/Homebrew/Library/Taps/homebrew/homebrew-core \
&& brew tap homebrew/core

rm -rf /usr/local/Homebrew/Library/Taps/homebrew/homebrew-cask \
&& brew tap homebrew/cask
此外,安装Stork成功后,直接运行stork -h命令可能依旧提示找不到stork命令,此时只需将Brew中的Stork进行命令绑定即可:
brew link stork
4. 配置主题参数
接下来,我们配置 pelicanconf.py 以满足实际环境的需要。以下示例主要参考官方库中的配置文件进行相应调整:
AUTHOR = 'Xavier'
SITENAME = '国民老公'
SITEURL = ''
TIMEZONE = 'Asia/Shanghai'
DEFAULT_LANG = 'zh-CN'
SUBTITLE = 'Xavier'
SUBTEXT = '''
一个仍然有望成为<b>国民老公</b>的人。<br>
科技至上主义者,坚信颠覆性创新的力量。<br>
更多信息,可前往 <a class="underline"
href="https://niaodian.com/">鳥電</a> 获取。
'''
COPYRIGHT = '©2023'
PATH = 'content'
THEME = 'themes/Papyrus'
THEME_STATIC_PATHS = ['static']
PLUGIN_PATHS = ['pelican-plugins']
PLUGINS = ['readtime', 'search', 'neighbors', 'pelican-toc']
STATIC_PATHS = [
'images',
'images/favicon.ico',
'extra/robots.txt',
]
EXTRA_PATH_METADATA = {
'extra/robots.txt': {'path': 'robots.txt'},
'images/favicon.ico': {'path': 'favicon.ico'},
}
DISPLAY_PAGES_ON_MENU = True
DIRECT_TEMPLATES = (('index', 'search', 'tags', 'categories', 'archives',))
PAGINATED_TEMPLATES = {'index': None, 'tag': None, 'category': None, 'author': None, 'archives': 24, }
# Site search plugin
SEARCH_MODE = "output"
SEARCH_HTML_SELECTOR = "main"
# Table of Content Plugin
TOC = {
'TOC_HEADERS': '^h[1-3]', # What headers should be included in
# the generated toc
# Expected format is a regular expression
'TOC_RUN': 'true', # Default value for toc generation,
# if it does not evaluate
# to 'true' no toc will be generated
'TOC_INCLUDE_TITLE': 'false', # If 'true' include title in toc
}
# Feed generation is usually not desired when developing
FEED_ALL_ATOM = 'feeds/all.atom.xml'
CATEGORY_FEED_ATOM = None
TRANSLATION_FEED_ATOM = None
AUTHOR_FEED_ATOM = None
AUTHOR_FEED_RSS = None
RSS_FEED_SUMMARY_ONLY = True
# Social widgets 改成您自己的社交账号
SOCIAL = (
('github', 'https://github.com/niaodian'),
('twitter', 'https://twitter.com/niaodian'),
('instagram', 'https://instagram.com/niaodian'),
('telegram', 'https://t.me/niaodian'),
)
# Article share widgets
SHARE = (
("twitter", "https://twitter.com/intent/tweet/?text=Features&url="),
("linkedin", "https://www.linkedin.com/sharing/share-offsite/?url="),
("reddit", "https://reddit.com/submit?url="),
("facebook", "https://facebook.com/sharer/sharer.php?u="),
("whatsapp", "https://api.whatsapp.com/send?text=Features - "),
("telegram", "https://telegram.me/share/url?text=Features&url="),
)
DEFAULT_PAGINATION = 8
# Uncomment following line if you want document-relative URLs when developing
# RELATIVE_URLS = True
# DISQUS_SITENAME = ''
# GOOGLE_ANALYTICS = ''
5. 撰写文章
文章标题示例如下。强烈建议添加Summary(摘要)字段。它可以代替文章描述,并被添加到html 的元数据中。摘要也可用于博客首页。它们有助于在没有标题、图片或代码块的情况下,保持相似高度的文章预览。
Title: Installation
Date: 2023-07-13
Tags: CSS, Markdown, Python, AI
Category: Software
Summary: Lorem ipsum dolor sit amet, consectetuer adipiscing elit. Nullam dignissim convallis est. Quisque aliquam. Donec faucibus. Nunc iaculis suscipit dui. Nam sit amet sem. Aliquam libero nisi, imperdiet at, tincidunt nec, gravida vehicula, nisl.
在名为页面的目录内创建的文章将有一个单独的静态页面和一个直接链接,类似于 "关于 "页面。
现在您可以运行开发服务器并访问 http://127.0.0.1:8000/
pelican content \
&& pelican --autoreload --listen --ignore-cache
最终的项目目录结构看起来像这样:
$ (pelican) ➜ myProject tree
├── myBlog
│   ├── content
│   │   ├── images
│   │   │   └── camera.png
│   │   ├── pages
│   │   │   ├── about.md
│   │   │   └── events.md
│   │   ├── Hardware
│   │   │   ├── article-one.md
│   │   │   └── article-two.md
│   │   └── Software
│   │       ├── article-three.md
│   │       └── article-four.md
│   ├── Makefile
│   ├── output
│   │
│   ├── pelicanconf.py
│   ├── pelican-plugins
│   │   └── pelican-toc
│   │
│   ├── publishconf.py
│   ├── tasks.py
│   └── themes
│       └── Papyrus
└── venv
6. 关于图像尺寸和位置
通过在markdown中添加自定义类名,如 image-left、image-right、image-center,可以在页面上放置图片。
同样,可以使用自定义类image-thumbnail、image-small、image-medium 和 image-large 为放置的图片指定尺寸。
您也可以在Markdown中直接用 <img/> 标签配合自定义图片类来使用。
<img src="{static}/images/screenshot.png" alt="screenshot" class="image-left image-medium" />
<img src="{static}/images/screenshot.png" alt="screenshot" class="image-right image-thumbnail" />

Alternatively you could use inline styling.
<img src="{static}/images/screenshot.png" alt="screenshot" style="width:200px;" />
7. 嵌入视频
为了获得响应式视频缩略图,在Markdown文档中,<iframe> 标签必须包裹在标记文件中的<div class="aspect-w-16 aspect-h-9"></div> 内。
<div class="aspect-w-16 aspect-h-9">
    <iframe width="736" height="414" src="https://www.youtube.com/embed/TmWIrBPE6Bc" title="YouTube video player" frameborder="0" allow="accelerometer; autoplay; clipboard-write; encrypted-media; gyroscope; picture-in-picture" allowfullscreen>
    </iframe>
</div>
8. Tailwind CSS
如果您想进行任何本地更改,主题中也包含了tailwindcss配置文件。首先进入Papyrus目录,使用 npm install 安装缺失的软件包。然后运行开发服务器,该服务器会在 templates 文件夹中监测您更改的tailwind类,并随时更新 main.css 。记得要先装好Node.js哦。
# Initial installation of packages
$ npm install

# JIT compiled main.css
$ npm run dev
9. 性能和搜索引擎优化改进
设置文件中现在有 robots.txt 和 favicon.ico 文件的占位符。请注意,这些文件未包含在内,需要您自行添加。
├── content
│    ├── extra
│    │    └── robots.txt
│    ├── images
│    │   ├── favicon.ico
│    │   └── camera.png
如果您是从旧版本更新而来,请确保您的 pelicanconf.py 更新了 EXTRA_PATH_METADATA 和 STATIC_PATHS,如上面的示例设置所示。
配置本地Git环境
如果想要顺利地将本地部署的Pelican项目提交至Github仓库,需要完成一些准备工作。
请注意,如果此前已完成Git相关配置,可直接跳至Git提交部分
1. 为Github账号配置SSH keys
可在本地计算机上生成新的 SSH 密钥。 生成密钥后,可以将公钥添加到你在 GitHub.com 上的帐户,以启用通过 SSH 进行 Git 操作的身份验证。
-
打开终端Git Bash
-
粘贴下面的文本(邮件替换为您的 GitHub 电子邮件地址)
ssh-keygen -t ed25519 -C "[email protected]"
如果系统过于老旧,可能不支持Ed25519算法,可改用RSA算法:
ssh-keygen -t rsa -b 4096 -C "[email protected]"
根据提示,完成密钥生成。本例中,passphrase 为空。
-
SSH keys默认存储在
/Users/YOU/.ssh/目录中。如果不希望在每次使用密钥时都输入密码,我们需要将生成的SSH密钥添加到ssh-agent -
在后台启动
ssh-agent
$ eval "$(ssh-agent -s)"
> Agent pid 59566
根据环境不同,可能需要使用不同的命令。 例如,在启动 ssh-agent 之前,可能需要通过运行 sudo -s -H 根访问,或者可能需要使用 exec ssh-agent bash 或 exec ssh-agent zsh 运行 ssh-agent。
- 如果使用的是 macOS Sierra 10.12.2 或更高版本,则需要修改
~/.ssh/config文件以自动将密钥加载到 ssh-agent 中并在密钥链中存储密码。
检查 ~/.ssh/config 文件是否在默认位置
$ open ~/.ssh/config
> The file /Users/YOU/.ssh/config does not exist.
文件不存在则创建该文件
touch ~/.ssh/config
打开 ~/.ssh/config 文件,然后修改文件以包含以下行。 如果您的 SSH 密钥文件与示例代码具有不同的名称或路径,请修改文件名或路径以匹配您当前的设置
Host github.com
    AddKeysToAgent yes
    IgnoreUnknown UseKeychain
    # 如果你选择不向密钥添加密码,应该省略 UseKeychain 行。
    # 如果看到 Bad configuration option: usekeychain 错误,请在配置的 Host *.github.com 部分添加额外的一行。
    #UseKeychain yes
    IdentityFile ~/.ssh/id_ed25519
- 将 SSH 私钥添加到 ssh-agent 并将密码存储在密钥链中。 如果使用其他名称创建了密钥或要添加具有其他名称的现有密钥,请将命令中的 ided25519 替换为私钥文件的名称。
ssh-add --apple-use-keychain ~/.ssh/id_ed25519
- 将 SSH 公钥添加到 GitHub 上的帐户。
将 SSH 公钥复制到剪贴板
pbcopy < ~/.ssh/id_ed25519.pub # 复制 id_ed25519.pub 文件至剪贴板,如果不起作用,可以改用 cat ~/.ssh/id_ed25519.pub
访问SSH and GPG keys,添加新的SSH密钥即可
- 测试SSH连接
ssh -T [email protected]
指纹如果一致,则表示测试成功:Hi USERNAME! You've successfully authenticated, but GitHub does not provide shell access.
2. Git提交项目至Github仓库
配置git全局变量,并检查配置:
git config --global user.name "[username]"
git config --global user.email "[email address]"
# [可选] 启用带帮助的彩色命令行输出
git config --global color.ui auto
# 对于 Windows 用户,建议额外执行下面两条配置
git config --global core.autocrlf true
git config --global core.safecrlf warn

# 检查现在的配置
git config --list
# 获得 config 命令手册
git help config
由于插件pelican-plugins/pelican-toc为外部仓库,直接克隆使用时将不包含其仓库中的文件,后续会产生问题。因此,需要通过submodule的方式进行安装:
git rm --cached pelican-plugins/pelican-toc -f
git rm --cached themes/Papyrus -f

git submodule add https://github.com/ingwinlu/pelican-toc.git pelican-plugins/pelican-toc

git submodule add https://github.com/aleylara/Papyrus.git themes/Papyrus
在正式开始提交前,我们还有非常重要的一步,接下来运行:
pip freeze > requirements.txt
在本地Pelican项目文件夹下,进行git初始化及提交等动作:
# 初始化 Git 仓库
git init

git add .
git commit -m "initial commit"

git branch -M main

# 可以部署至公有或私有仓库,建议始终部署至私有仓库,以避免一旦发生信息泄露而出现无法控制的局面
git remote add origin [email protected]:username/username.github.io.git
git push -u origin main
在此处,如果使用 git push -u origin master 会收到报错信息:
git push -u origin master

# 结果:
# error: src refspec master does not match any
# error: failed to push some refs to 'github.com:niaodian/xavier.git'
这个错误可能是由不同原因引起的。最有可能出现这种错误的原因是,master 分支并不存在。可能因为在您新的仓库中,默认的分支是 main,所以当试图推送时,没有 master 分支。
可以用 git branch -v 命令来显示连接到本地仓库的远程分支:
git branch -v

# 结果:
# * main b1...28 the first time commit
用git show-ref查看一下refs名称,确定就是分支问题引起的:
git show-ref

# 结果:
# b14a328...5a2a747 refs/heads/main
解决方法是将 git push origin HEAD:master 命令,替换为 git push origin HEAD:main 命令。
现在,我们可以正常进行push了,可是,又遇到了新问题 error: failed to push some refs to 'github.com:username/username.github.io.git':
git push -u origin main

# 结果:
# To github.com:username/username.github.io.git
#  ! [rejected]        main -> main (fetch first)
# error: failed to push some refs to 'github.com:username/username.github.io.git'
# hint: Updates were rejected because the remote contains work that you do
# hint: not have locally. This is usually caused by another repository pushing
# hint: to the same ref. You may want to first integrate the remote changes
# hint: (e.g., 'git pull ...') before pushing again.
# hint: See the 'Note about fast-forwards' in 'git push --help' for details.
这段提示信息的含义,表示线上版本的内容要比当前项目内的文件要更新,所以Git阻止了我们的提交。要解决这个问题,我们可以先拉再推:
# --rebase 参数表示:内容拉取之后采用rebase方式合并
git pull --rebase

# 结果:
remote: Enumerating objects: 3, done.
remote: Counting objects: 100% (3/3), done.
remote: Compressing objects: 100% (2/2), done.
remote: Total 3 (delta 0), reused 0 (delta 0), pack-reused 0
Unpacking objects: 100% (3/3), 12.40 KiB | 3.10 MiB/s, done.
From github.com:username/username.github.io
 * [new branch]      main       -> origin/main
There is no tracking information for the current branch.
Please specify which branch you want to rebase against.
See git-pull(1) for details.

    git pull <remote> <branch>

If you wish to set tracking information for this branch you can do so with:

    git branch --set-upstream-to=origin/<branch> main
然后再次提交:
git push -u origin main

# 如果仍旧报错的话,可以添加 -f 参数进行强制提交。由于强制提交可能会毁坏其他的commit记录,在团队协作项目中应谨慎使用。考虑本例为首次提交,使用 -f 参数可以快速解决问题。
# git push -u origin main -f

# 结果:
Enumerating objects: 43, done.
Counting objects: 100% (43/43), done.
Delta compression using up to 8 threads
Compressing objects: 100% (34/34), done.
Writing objects: 100% (43/43), 27.68 KiB | 4.61 MiB/s, done.
Total 43 (delta 12), reused 0 (delta 0), pack-reused 0
remote: Resolving deltas: 100% (12/12), done.
To github.com:username/username.github.io.git
 + dacc0dc...05d46b0 main -> main (forced update)
branch 'main' set up to track 'origin/main'.
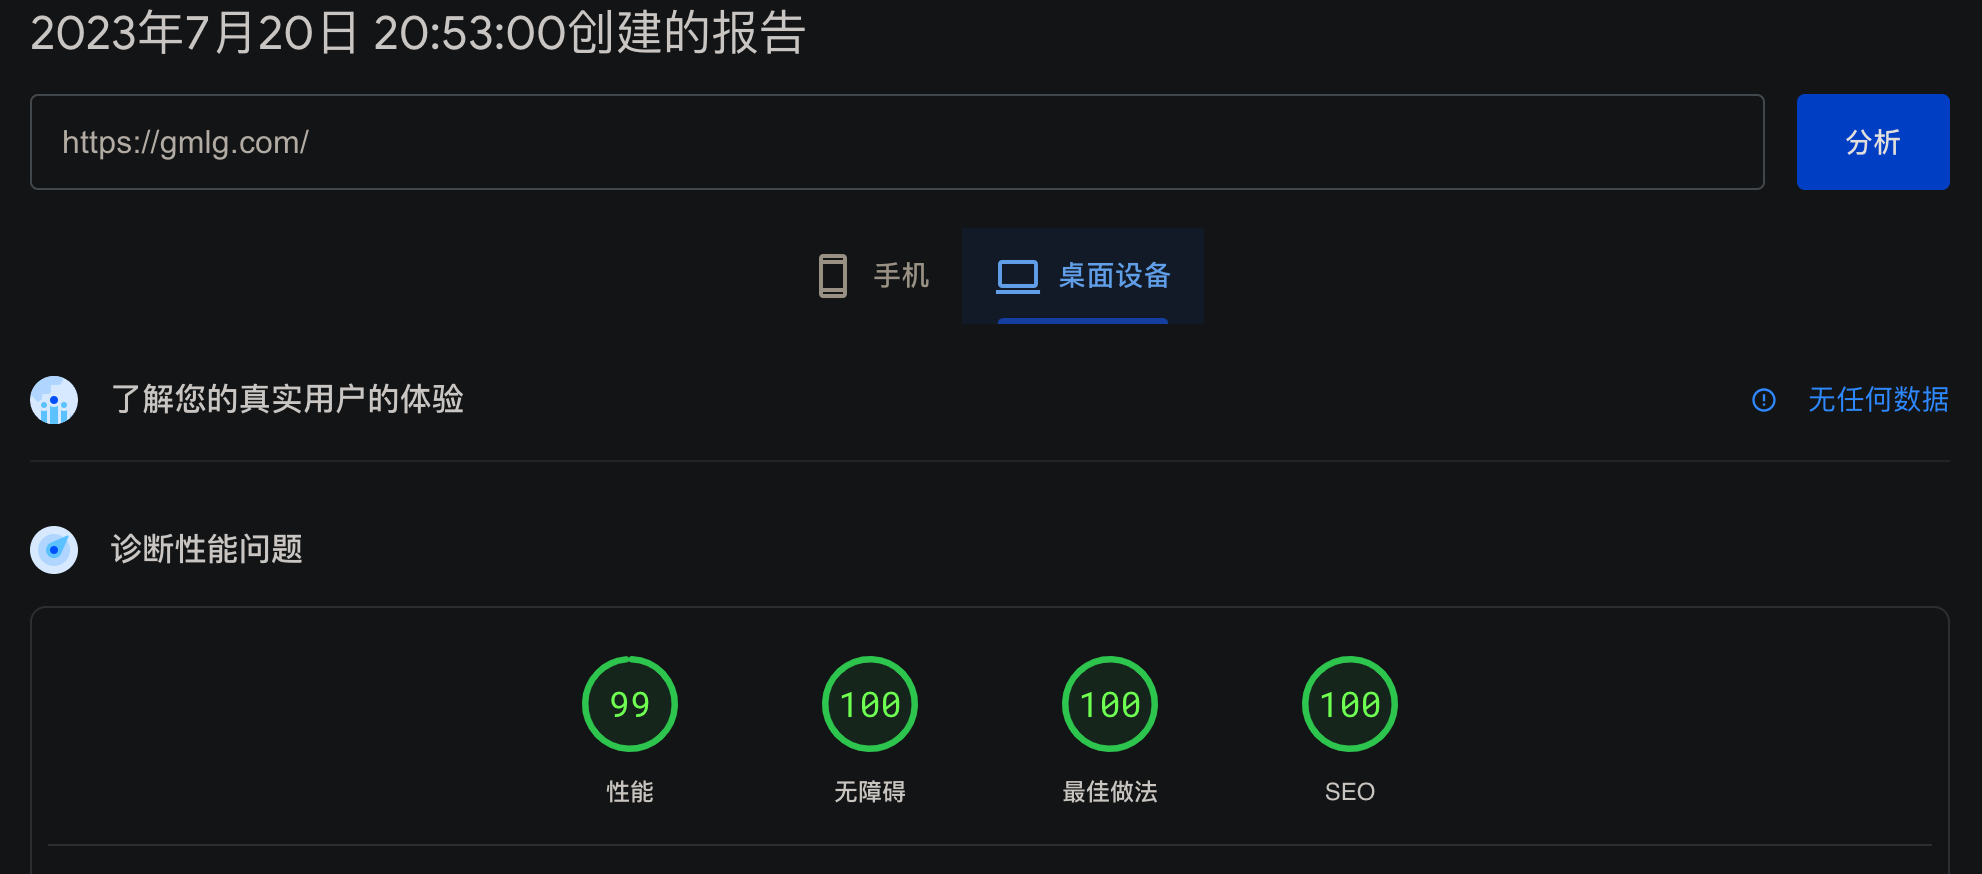
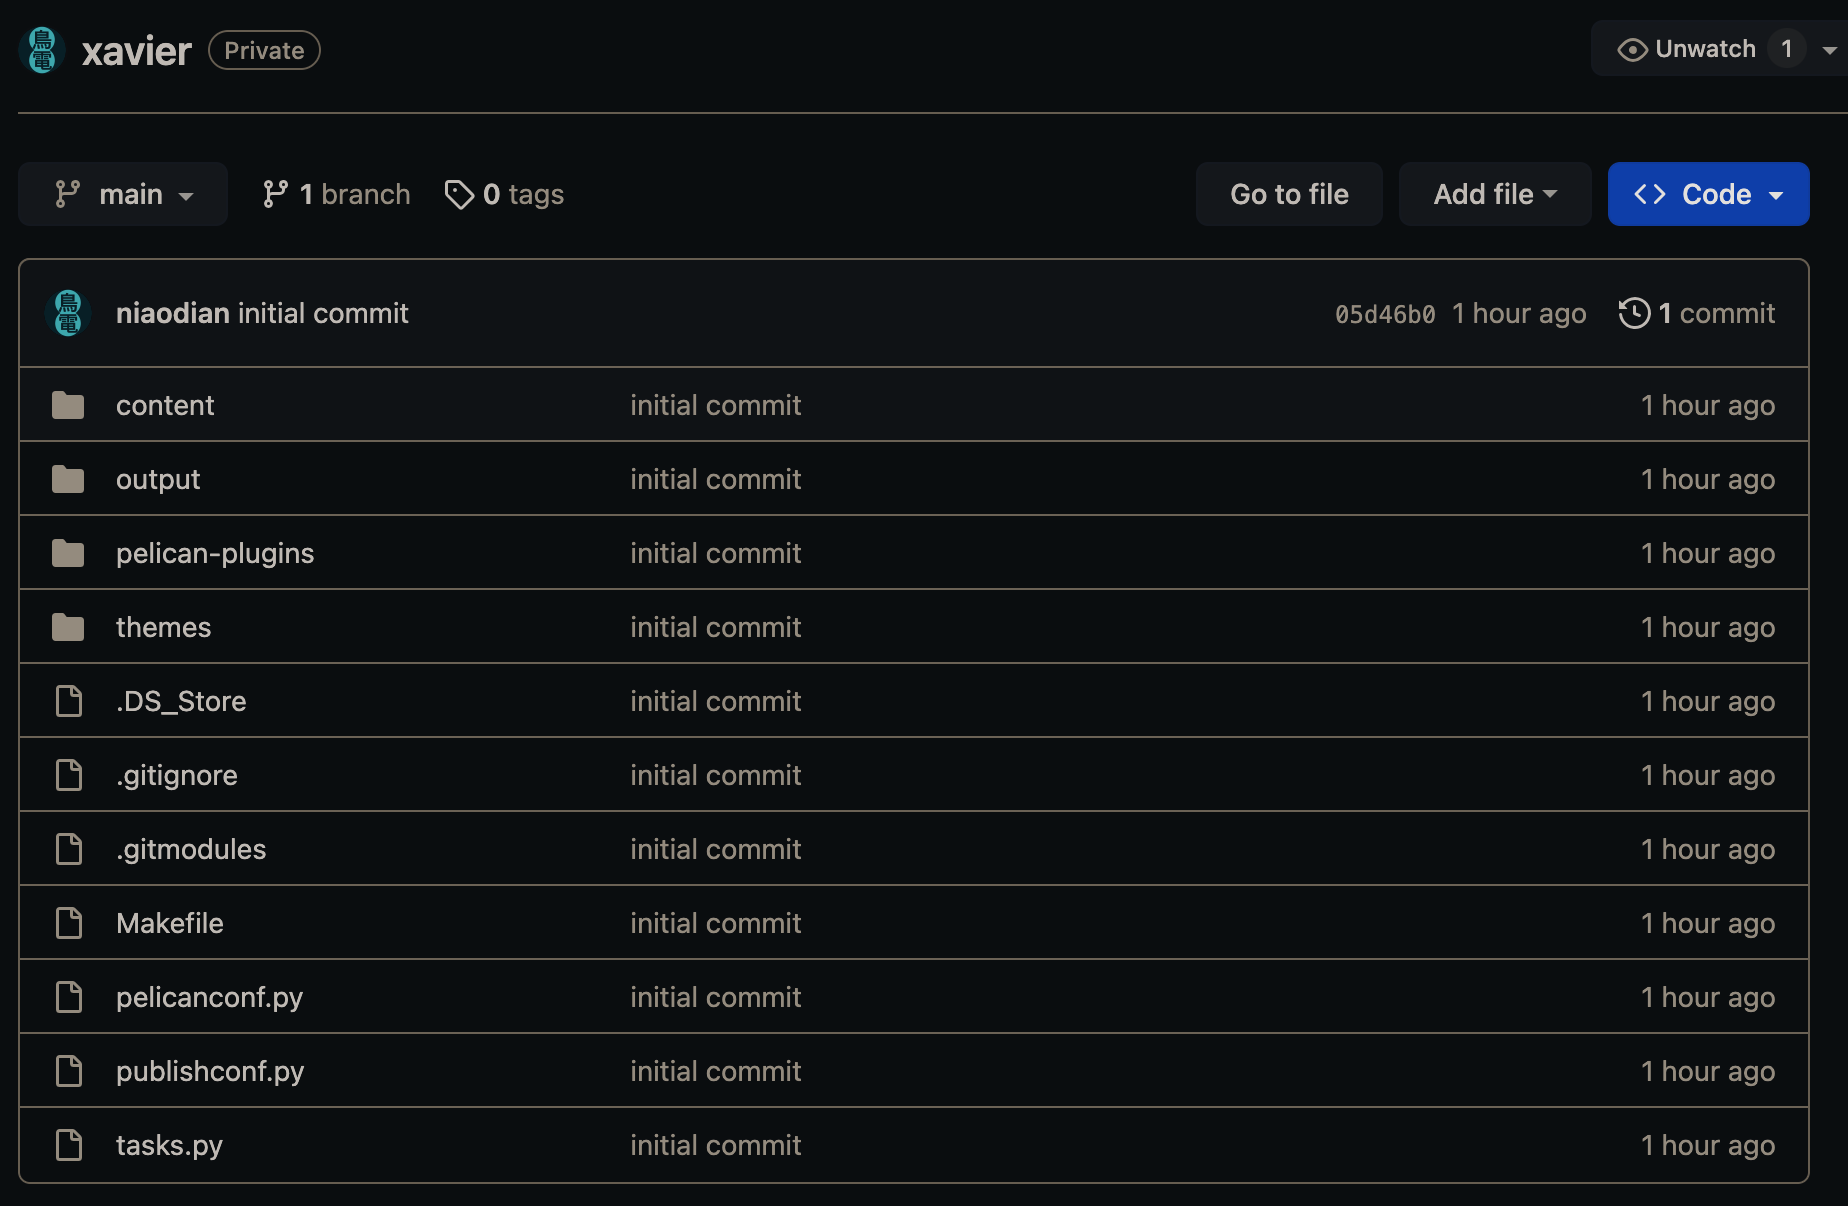
现在,检查一下线上仓库,发现已经成功提交:
部署上线
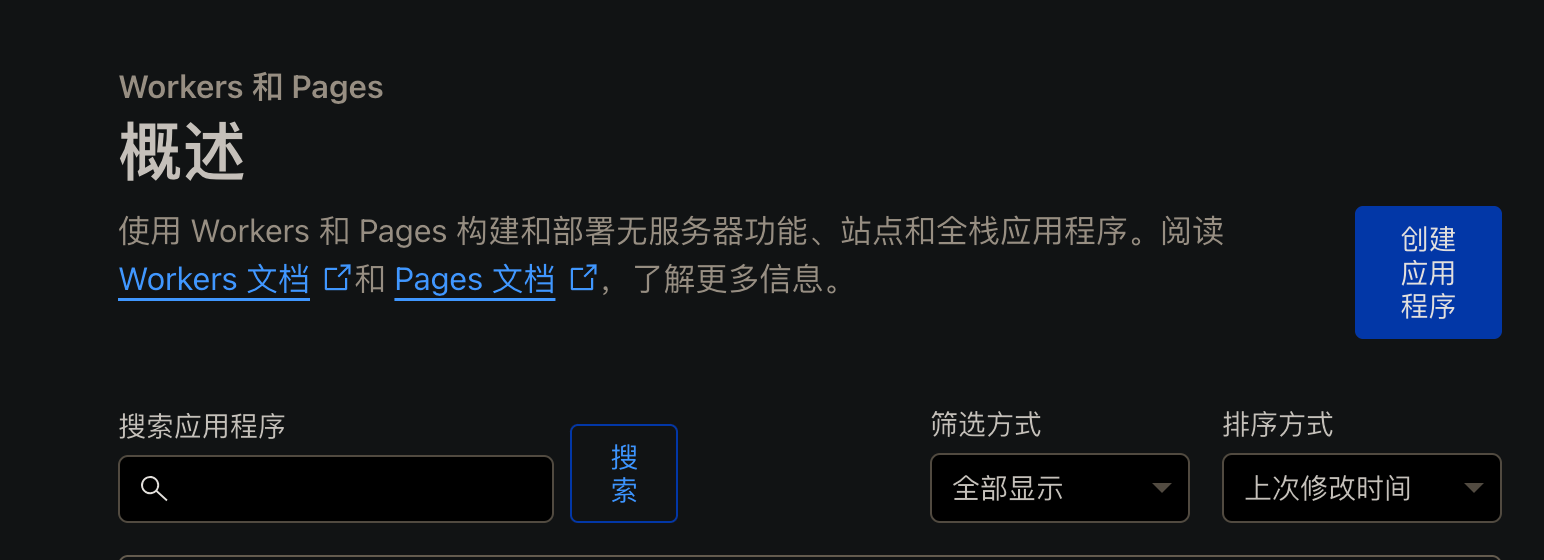
使用Cloudflare Pages部署站点
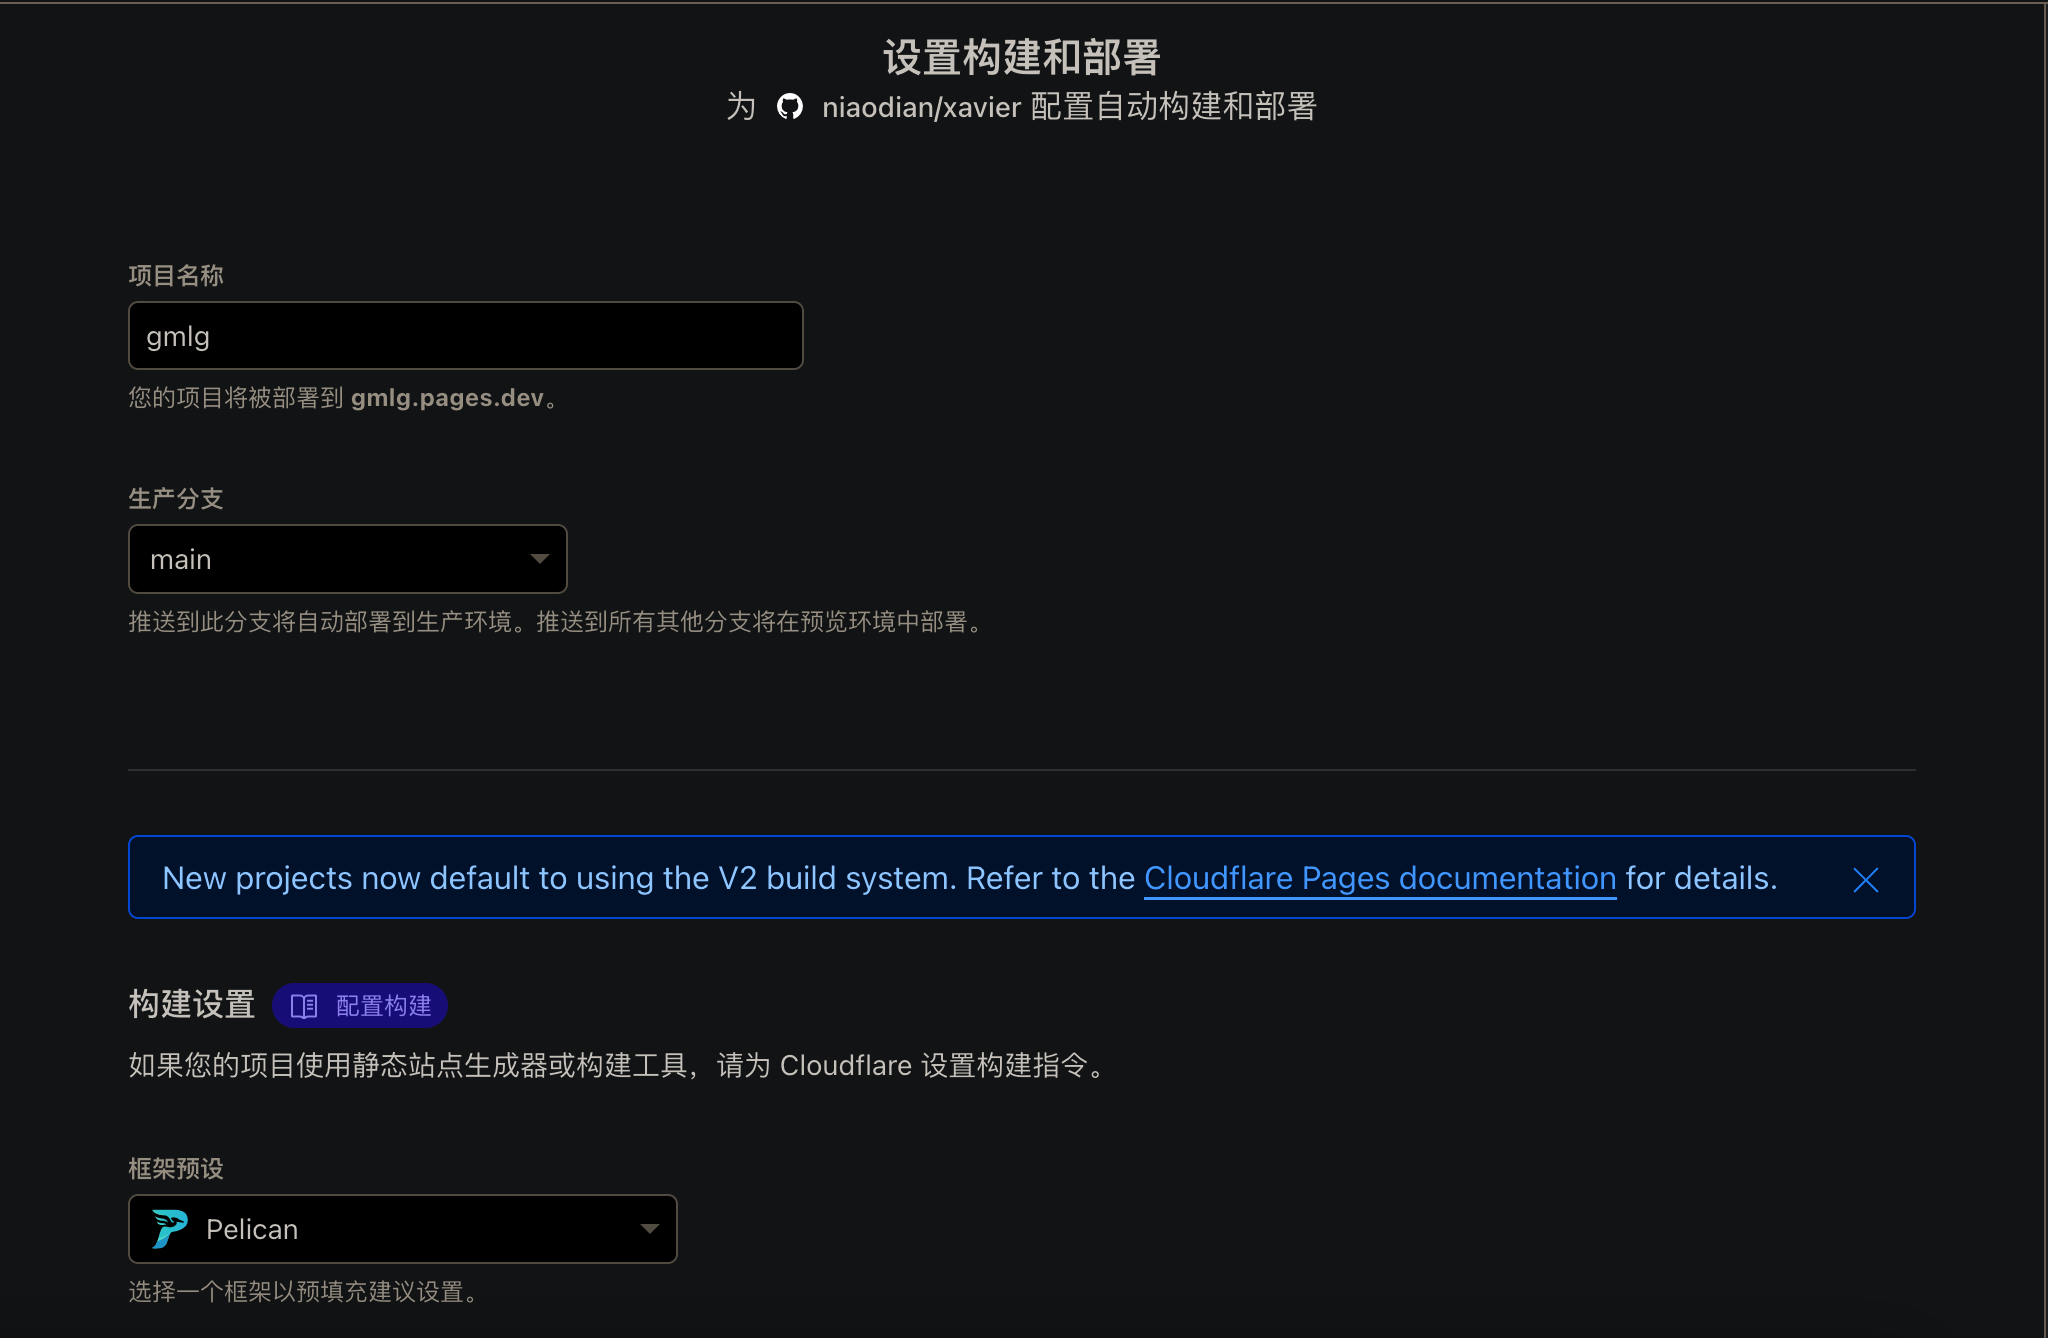
登录 Cloudflare Dashboard,选择左侧菜单栏中的 Workers和Pages,点击右上角 创建应用程序。
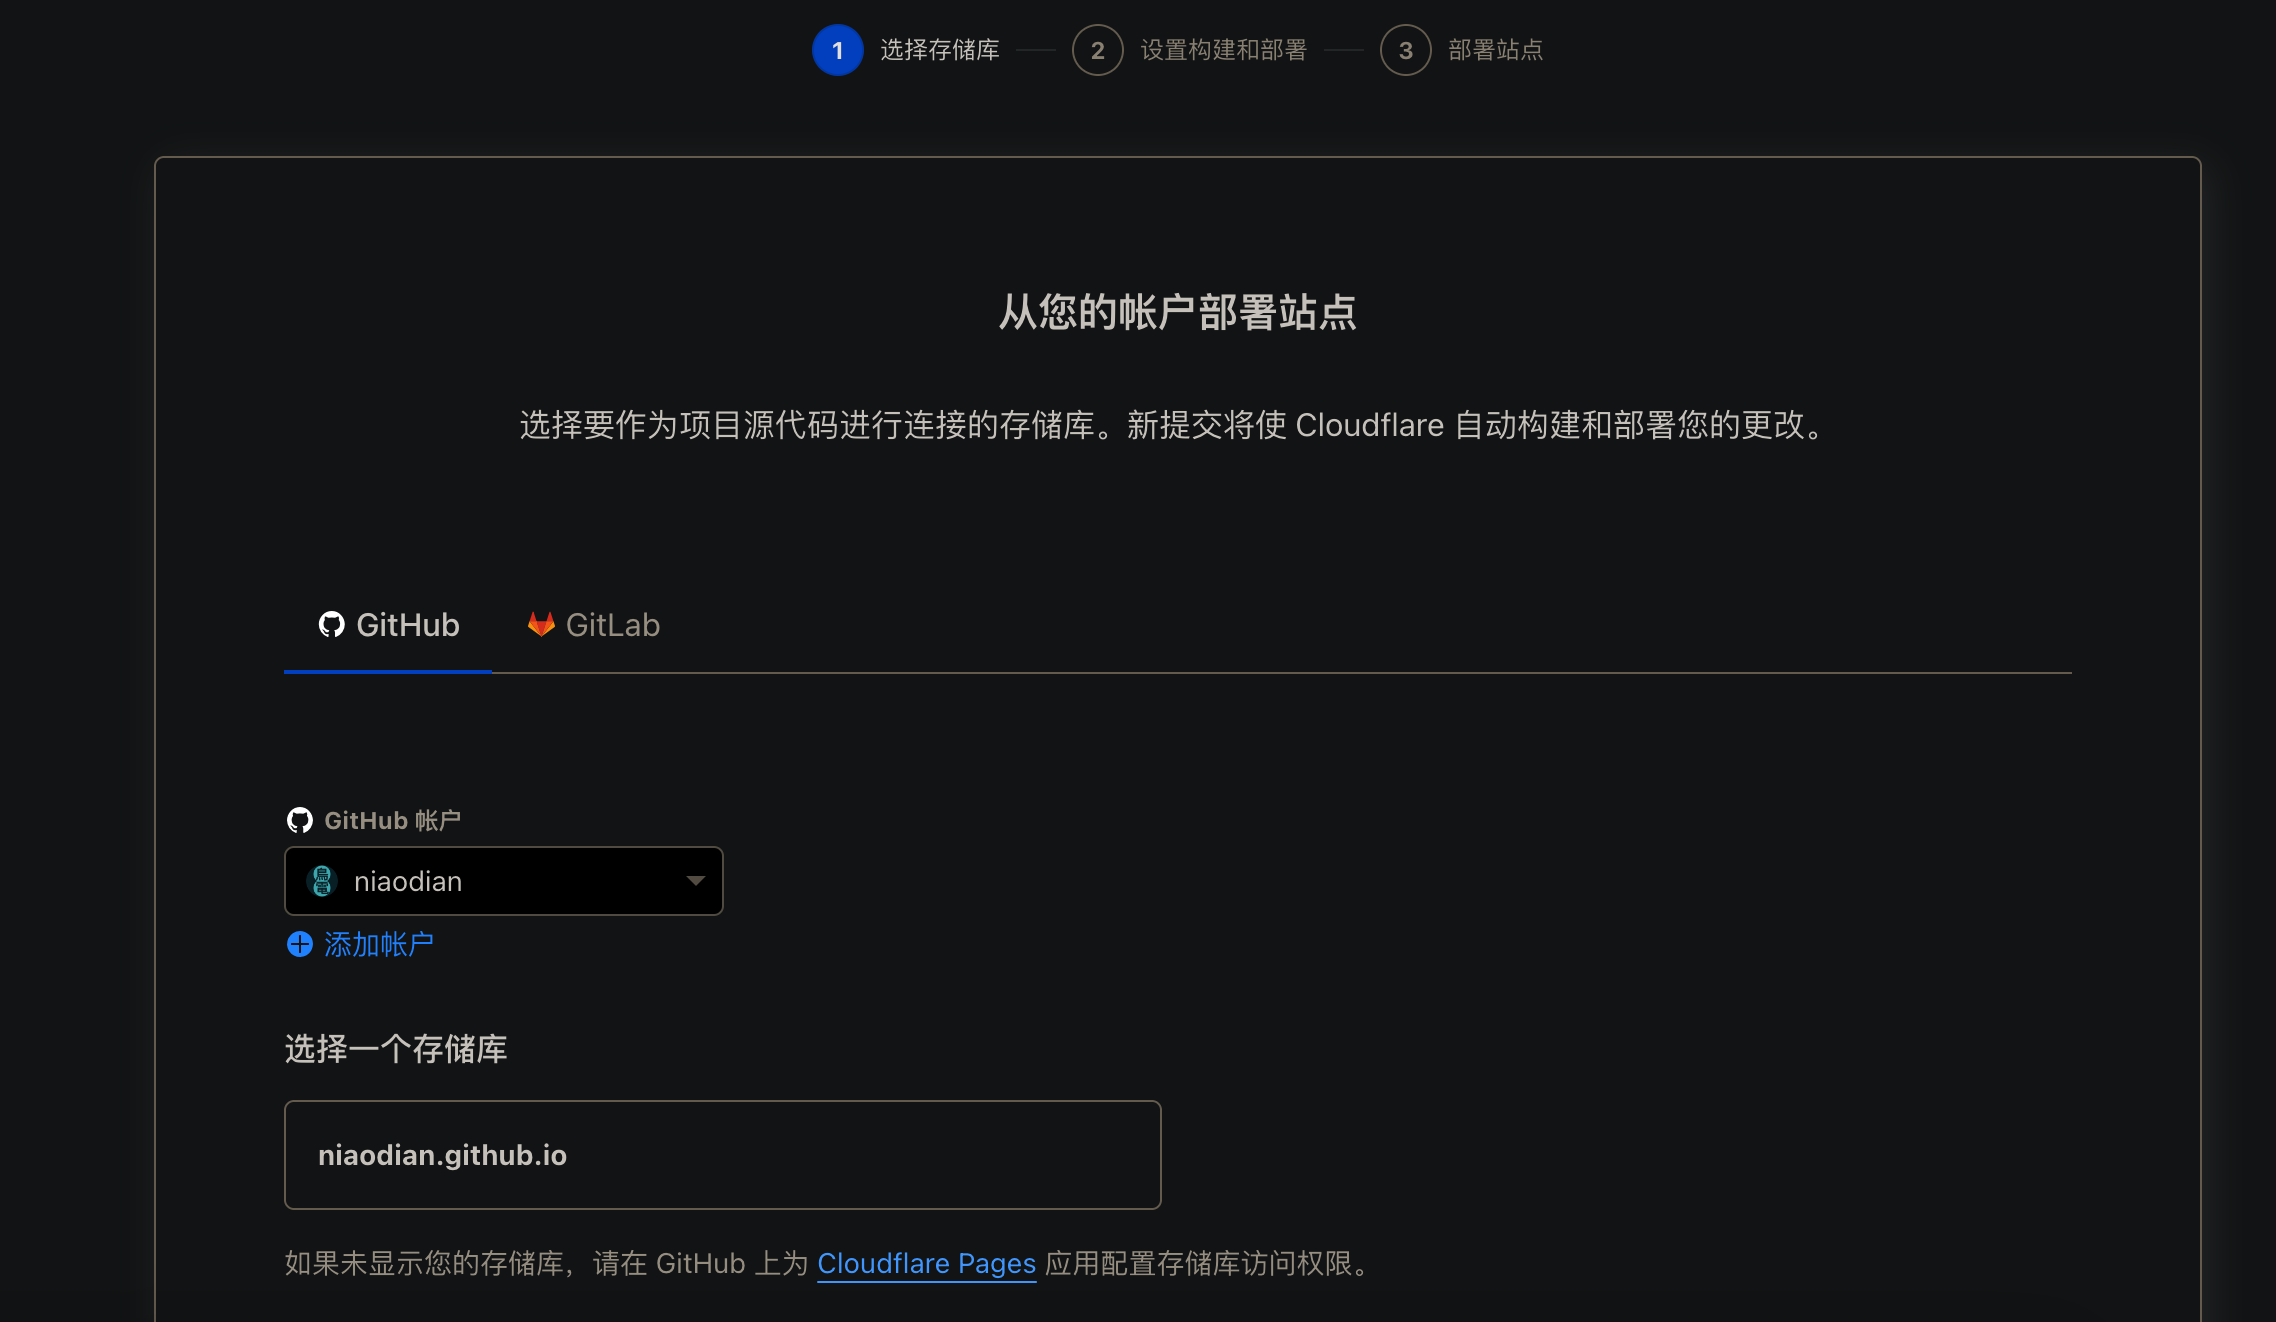
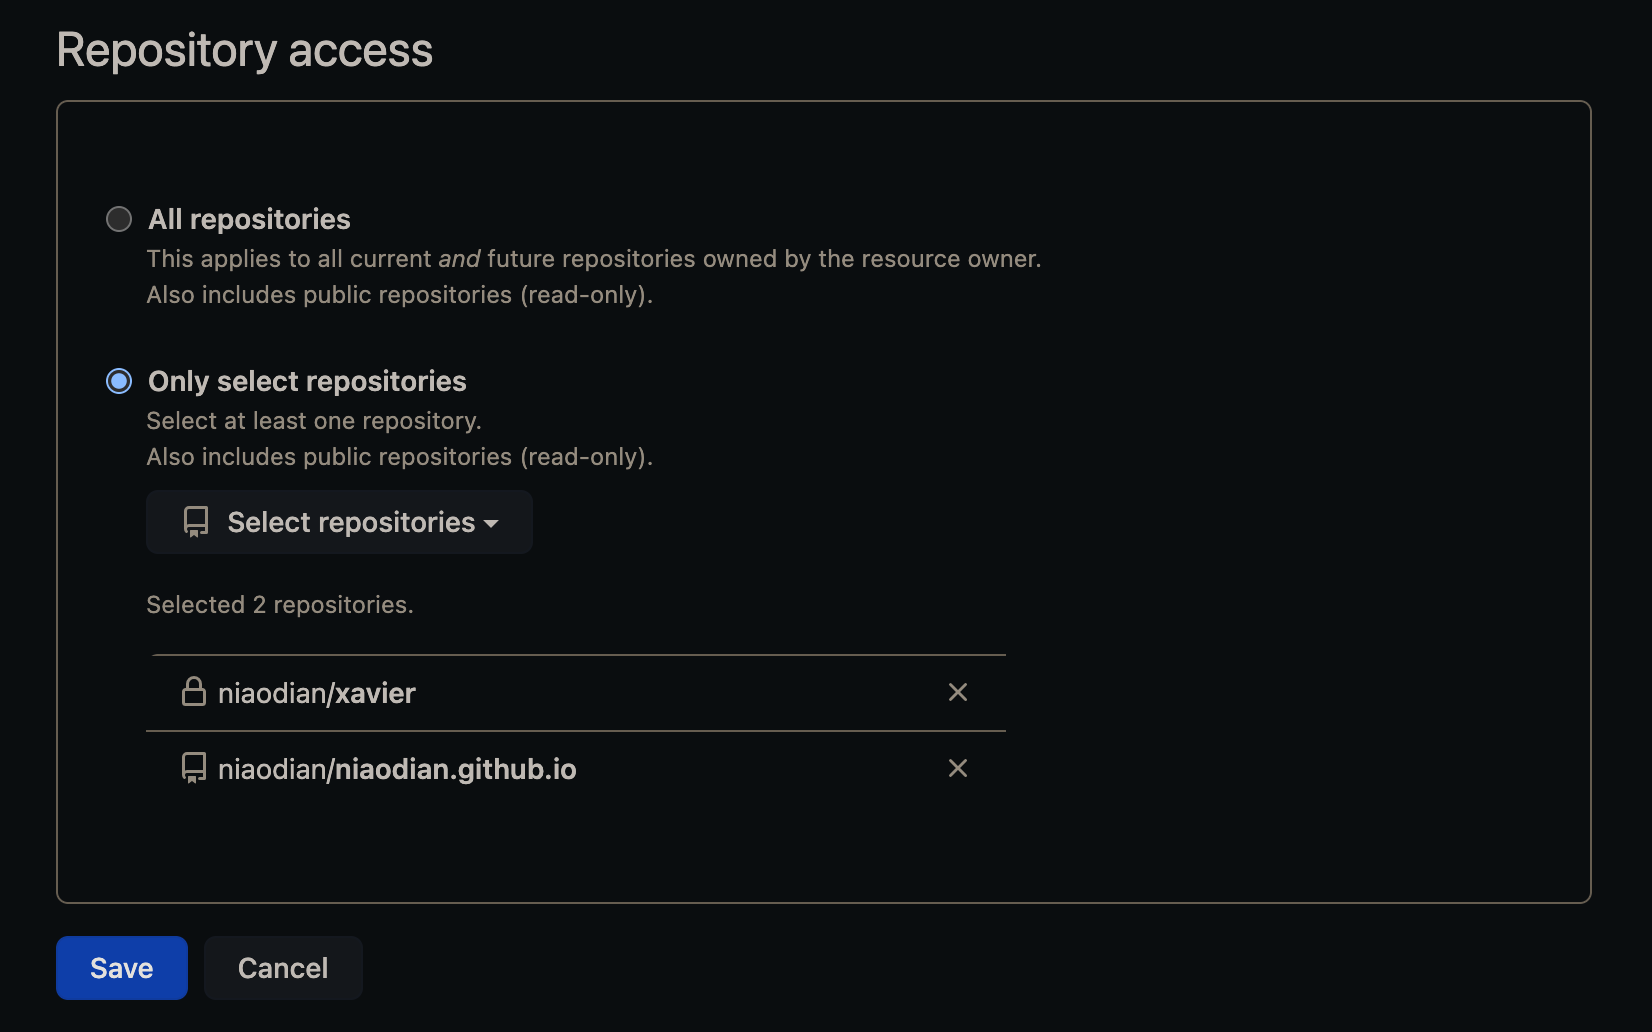
前往 GitHub应用 配置存储桶访问权限。
返回Cloudflare完成构建和部署。
构建部署时,会出现报错提示,原因是我们在本地通过手动安装的Stork在线上部署时未安装,因此需要在部署时单独对其进行安装,并加入系统路径。
Warning
下方Stork安装最终失败了,请勿跟随操作 :-)
接下来我们尝试安装Stork:
- 前往NPM官网生成NPM_TOKEN
- 在Cloudflare部署项目的设置中,添加环境变量,变量名称
NPM_TOKEN,值npm_EHIx...6kJ - 设置构建命令为
npm run build - 在项目文件夹中新建
package.json,并添加部署命令:json "scripts": { "build": "npm install stork-search && wget -O /usr/local/bin/stork https://files.stork-search.net/releases/v1.6.0/stork-ubuntu-20-04 && chmod +x /usr/local/bin/stork && pelican content" }, - 使用Git命令push至主分支,Cloudflare将自动开始部署
实测发现,由于权限限制,使用上述方式虽然可以成功下载Stork,但执行时调用Stork会出现Permission denied的错误,从而导致部署依然无法成功。
Note
替代解决方案
当在本地环境执行pelican content命令后,在output文件夹中生成的静态网页已经具备完整的搜索功能,因此,我们实际上只需要将output文件夹中的内容部署至Cloudflare即可,无需从0开始构建整个Pelican的生产环境。
基于这个思路,我们可以为项目仓库username.github.io新增gh-pages分支,并将output文件夹中的内容push至该分支,然后在Cloudflare Pages中选择gh-pages分支进行部署即可。
需要注意的是,构建设置中的框架预设、构建命令和构建输出目录均留空即可。
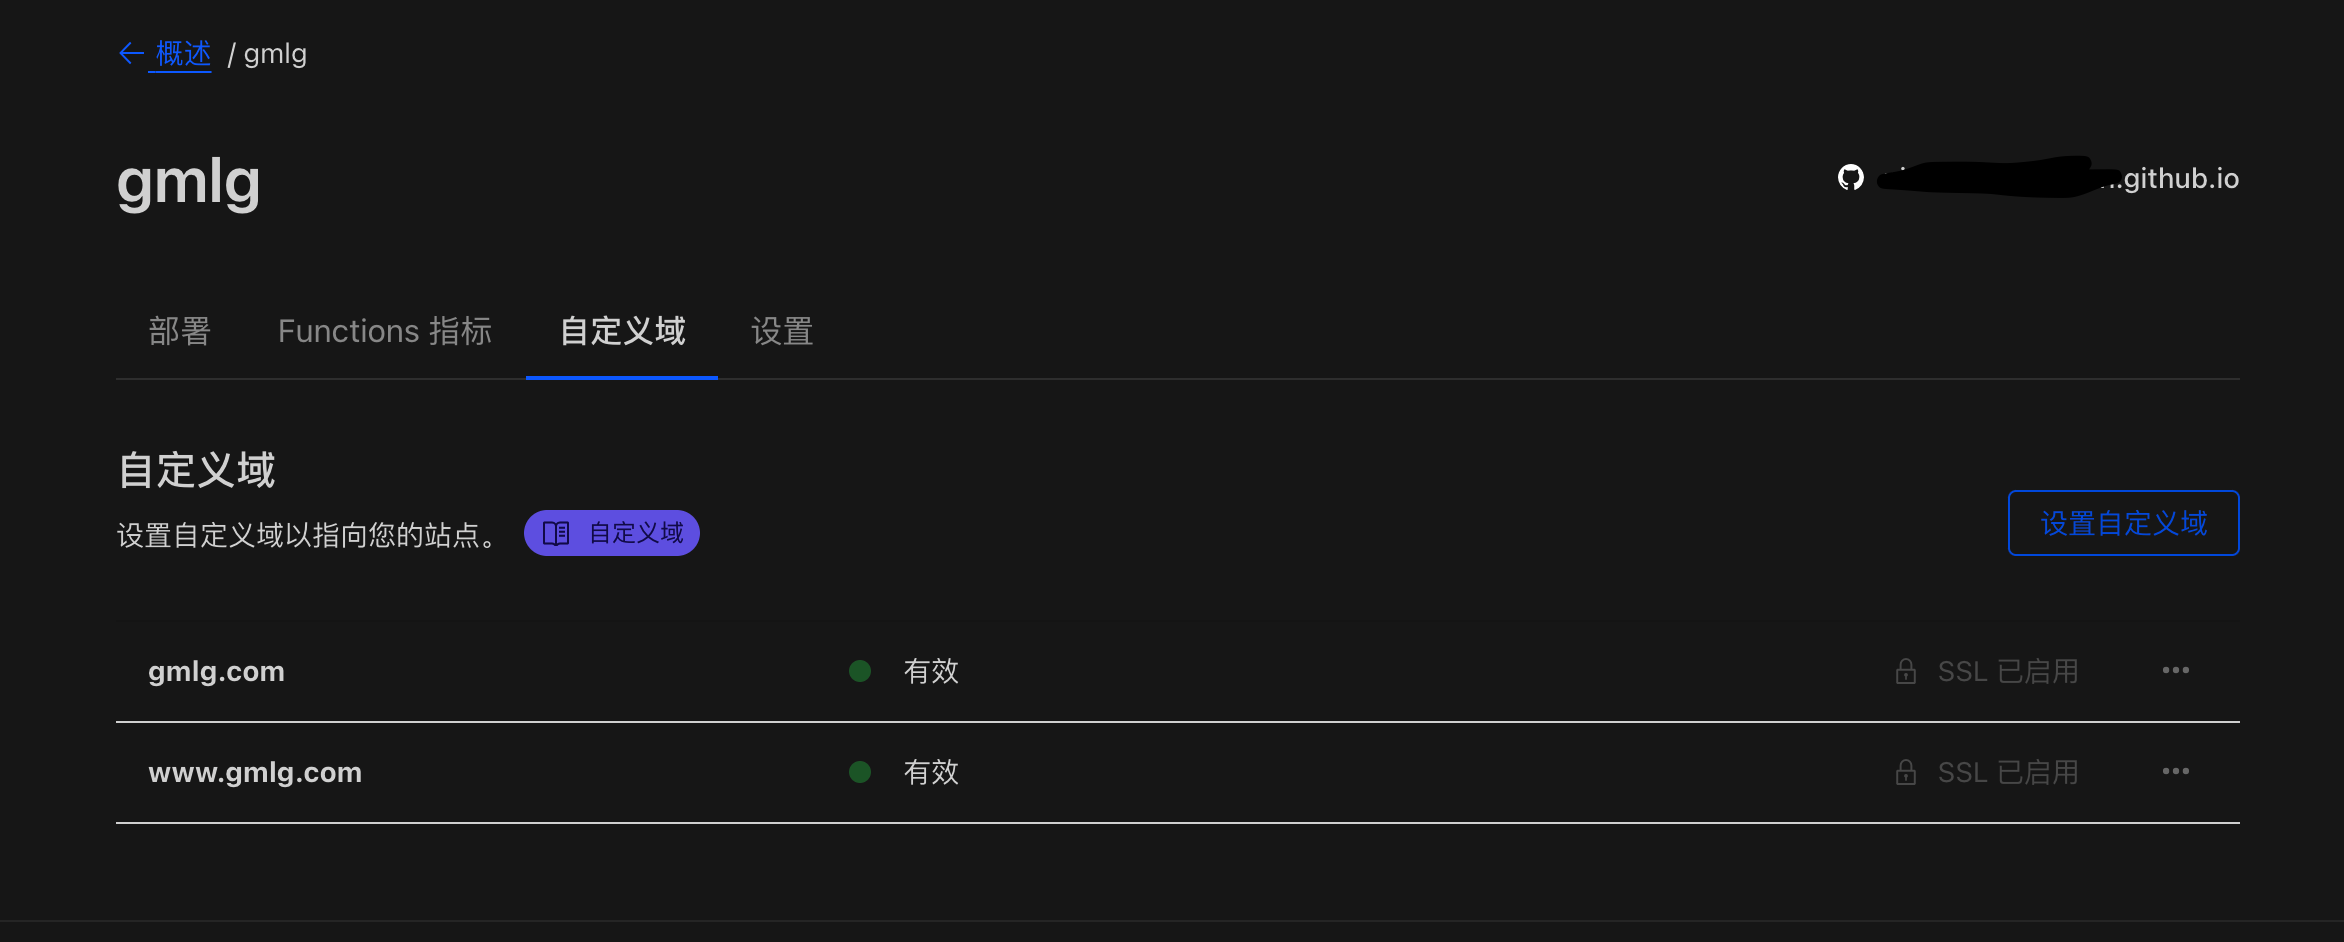
最后,只需要绑定自定义域名,即可完成部署。
完结,撒花~
总结
本篇手记是在探索使用Pelican部署静态网页博客过程中的详细记录。对于很多技术型读者来说,可能教程过于初级。即便如此,相信对于很多初次接触Python和Pelican的非编程背景的读者而言,本文依然有一定的参考和借鉴意义。在作者部署过程中,确实也遇到很多奇奇怪怪的问题,其中关于在Cloudflare Pages部署的过程中,由于安装Stork不能成功,导致花费了大量的时间来寻找解决方案,虽然最终无法彻底解决,但也找到了替代的方案。如果有读者找到了成功安装的方法,也欢迎分享您的实践经验。谢谢大家!